> ## Documentation Index
> Fetch the complete documentation index at: https://docs.nova-cloud.ai/llms.txt
> Use this file to discover all available pages before exploring further.
# SSH Keys
> Generate and manage SSH keys for secure access to your Nova Cloud VMs.
SSH keys let you securely connect to your Nova Cloud virtual machines without needing a password. This guide walks you through everything step by step — even if you've never used SSH before.
## What Are SSH Keys?
SSH keys work like a digital lock-and-key system:
* **Private key** — Stays on your computer. Think of this as your house key — never share it.
* **Public key** — You upload this to Nova Cloud. Think of this as the lock on your door.
When you connect to a VM, your computer proves it has the matching private key. No password is sent over the internet, making it much more secure than password authentication.
## Do I Already Have an SSH Key?
Before generating a new key, check if you already have one.
Open **Terminal** (search for "Terminal" in Spotlight, or find it in Applications → Utilities) and run:
```bash theme={null}
ls ~/.ssh/id_ed25519.pub 2>/dev/null && echo "Key found!" || echo "No key found."
```
If you see **"Key found!"**, skip to [Upload Your Key](#uploading-your-ssh-key). Otherwise, follow the generation steps below.
Open **PowerShell** (search for "PowerShell" in the Start menu) and run:
```powershell theme={null}
if (Test-Path "$env:USERPROFILE\.ssh\id_ed25519.pub") { "Key found!" } else { "No key found." }
```
If you see **"Key found!"**, skip to [Upload Your Key](#uploading-your-ssh-key). Otherwise, follow the generation steps below.
Open a terminal and run:
```bash theme={null}
ls ~/.ssh/id_ed25519.pub 2>/dev/null && echo "Key found!" || echo "No key found."
```
If you see **"Key found!"**, skip to [Upload Your Key](#uploading-your-ssh-key). Otherwise, follow the generation steps below.
## Generating a New SSH Key
### Step 1: Open Terminal
* Press **Cmd + Space** to open Spotlight
* Type **Terminal** and press Enter
### Step 2: Generate the Key
Paste this command and press Enter:
```bash theme={null}
ssh-keygen -t ed25519 -C "your-email@example.com"
```
Replace `your-email@example.com` with your actual email (this is just a label to help you identify the key).
### Step 3: Save the Key
You'll see:
```
Enter file in which to save the key (/Users/yourname/.ssh/id_ed25519):
```
Just press **Enter** to accept the default location.
### Step 4: Set a Passphrase (Optional)
You'll be asked for a passphrase. You have two options:
* Press **Enter** twice for no passphrase (simpler, fine for most users)
* Type a passphrase for extra security (you'll need to enter it each time you connect)
### Step 5: Copy Your Public Key
```bash theme={null}
pbcopy < ~/.ssh/id_ed25519.pub
```
This copies the key to your clipboard silently — you won't see any output. Your key is ready to paste into the Nova Cloud console.
If `pbcopy` doesn't work, you can display the key and copy it manually:
```bash theme={null}
cat ~/.ssh/id_ed25519.pub
```
Select the entire output (it starts with `ssh-ed25519`) and copy it with **Cmd + C**.
### Step 1: Open PowerShell
* Click the **Start** button or press the **Windows key**
* Type **PowerShell** and click to open it
### Step 2: Generate the Key
Paste this command and press Enter:
```powershell theme={null}
ssh-keygen -t ed25519 -C "your-email@example.com"
```
Replace `your-email@example.com` with your actual email.
**Windows 10 (version 1809+) and Windows 11** include SSH tools by default. If you see an error like "ssh-keygen is not recognized", you need to enable the OpenSSH Client:
1. Open **Settings** → **Apps** → **Optional Features**
2. Click **Add a feature**
3. Search for **OpenSSH Client** and install it
4. Close and re-open PowerShell, then try again
### Step 3: Save the Key
You'll see:
```
Enter file in which to save the key (C:\Users\YourName\.ssh\id_ed25519):
```
Just press **Enter** to accept the default location.
### Step 4: Set a Passphrase (Optional)
You'll be asked for a passphrase. You have two options:
* Press **Enter** twice for no passphrase (simpler, fine for most users)
* Type a passphrase for extra security (you'll need to enter it each time you connect)
### Step 5: Copy Your Public Key
```powershell theme={null}
Get-Content $env:USERPROFILE\.ssh\id_ed25519.pub | Set-Clipboard
```
This copies the key to your clipboard. Your key is ready to paste into the Nova Cloud console.
If the clipboard command doesn't work, you can display the key and copy it manually:
```powershell theme={null}
Get-Content $env:USERPROFILE\.ssh\id_ed25519.pub
```
Select the entire output (it starts with `ssh-ed25519`) and copy it with **Ctrl + C**.
### Alternative: PuTTYgen (Older Windows Systems)
If you're on an older version of Windows without built-in SSH:
1. Download [PuTTY](https://www.chiark.greenend.org.uk/~sgtatham/putty/latest.html) (includes PuTTYgen)
2. Open **PuTTYgen** from the Start menu
3. Under "Type of key to generate", select **EdDSA** and ensure **Ed25519** is selected
4. Click **Generate** and move your mouse randomly in the window to create randomness
5. Once generated, the public key appears in the text box at the top — copy it
6. Click **Save private key** and save it somewhere safe on your computer
7. Paste the public key into the Nova Cloud console
If you use PuTTYgen, you'll need to use **PuTTY** (not the built-in `ssh` command) to connect to your VMs. For most Windows 10/11 users, the PowerShell method above is simpler.
### Step 1: Open a Terminal
Use your distribution's terminal application (e.g., GNOME Terminal, Konsole, xterm).
### Step 2: Generate the Key
```bash theme={null}
ssh-keygen -t ed25519 -C "your-email@example.com"
```
Replace `your-email@example.com` with your actual email.
### Step 3: Save the Key
Press **Enter** to accept the default location (`~/.ssh/id_ed25519`).
### Step 4: Set a Passphrase (Optional)
Press **Enter** twice for no passphrase, or type one for extra security.
### Step 5: Copy Your Public Key
```bash theme={null}
cat ~/.ssh/id_ed25519.pub
```
Select and copy the entire output line (it starts with `ssh-ed25519`).
If you have `xclip` or `wl-copy` installed, you can copy directly to the clipboard:
```bash theme={null}
# X11
xclip -selection clipboard < ~/.ssh/id_ed25519.pub
# Wayland
wl-copy < ~/.ssh/id_ed25519.pub
```
## Uploading Your SSH Key
1. Log in to [console.nova-cloud.ai](https://console.nova-cloud.ai)
2. Go to **Account Settings** → **SSH Keys**
3. Click **Add SSH Key**
4. Paste your public key (the text you copied above — it starts with `ssh-ed25519`)
5. Enter a name to help you remember which computer this key is from (e.g., "MacBook Pro", "Work Desktop")
6. Click **Save**
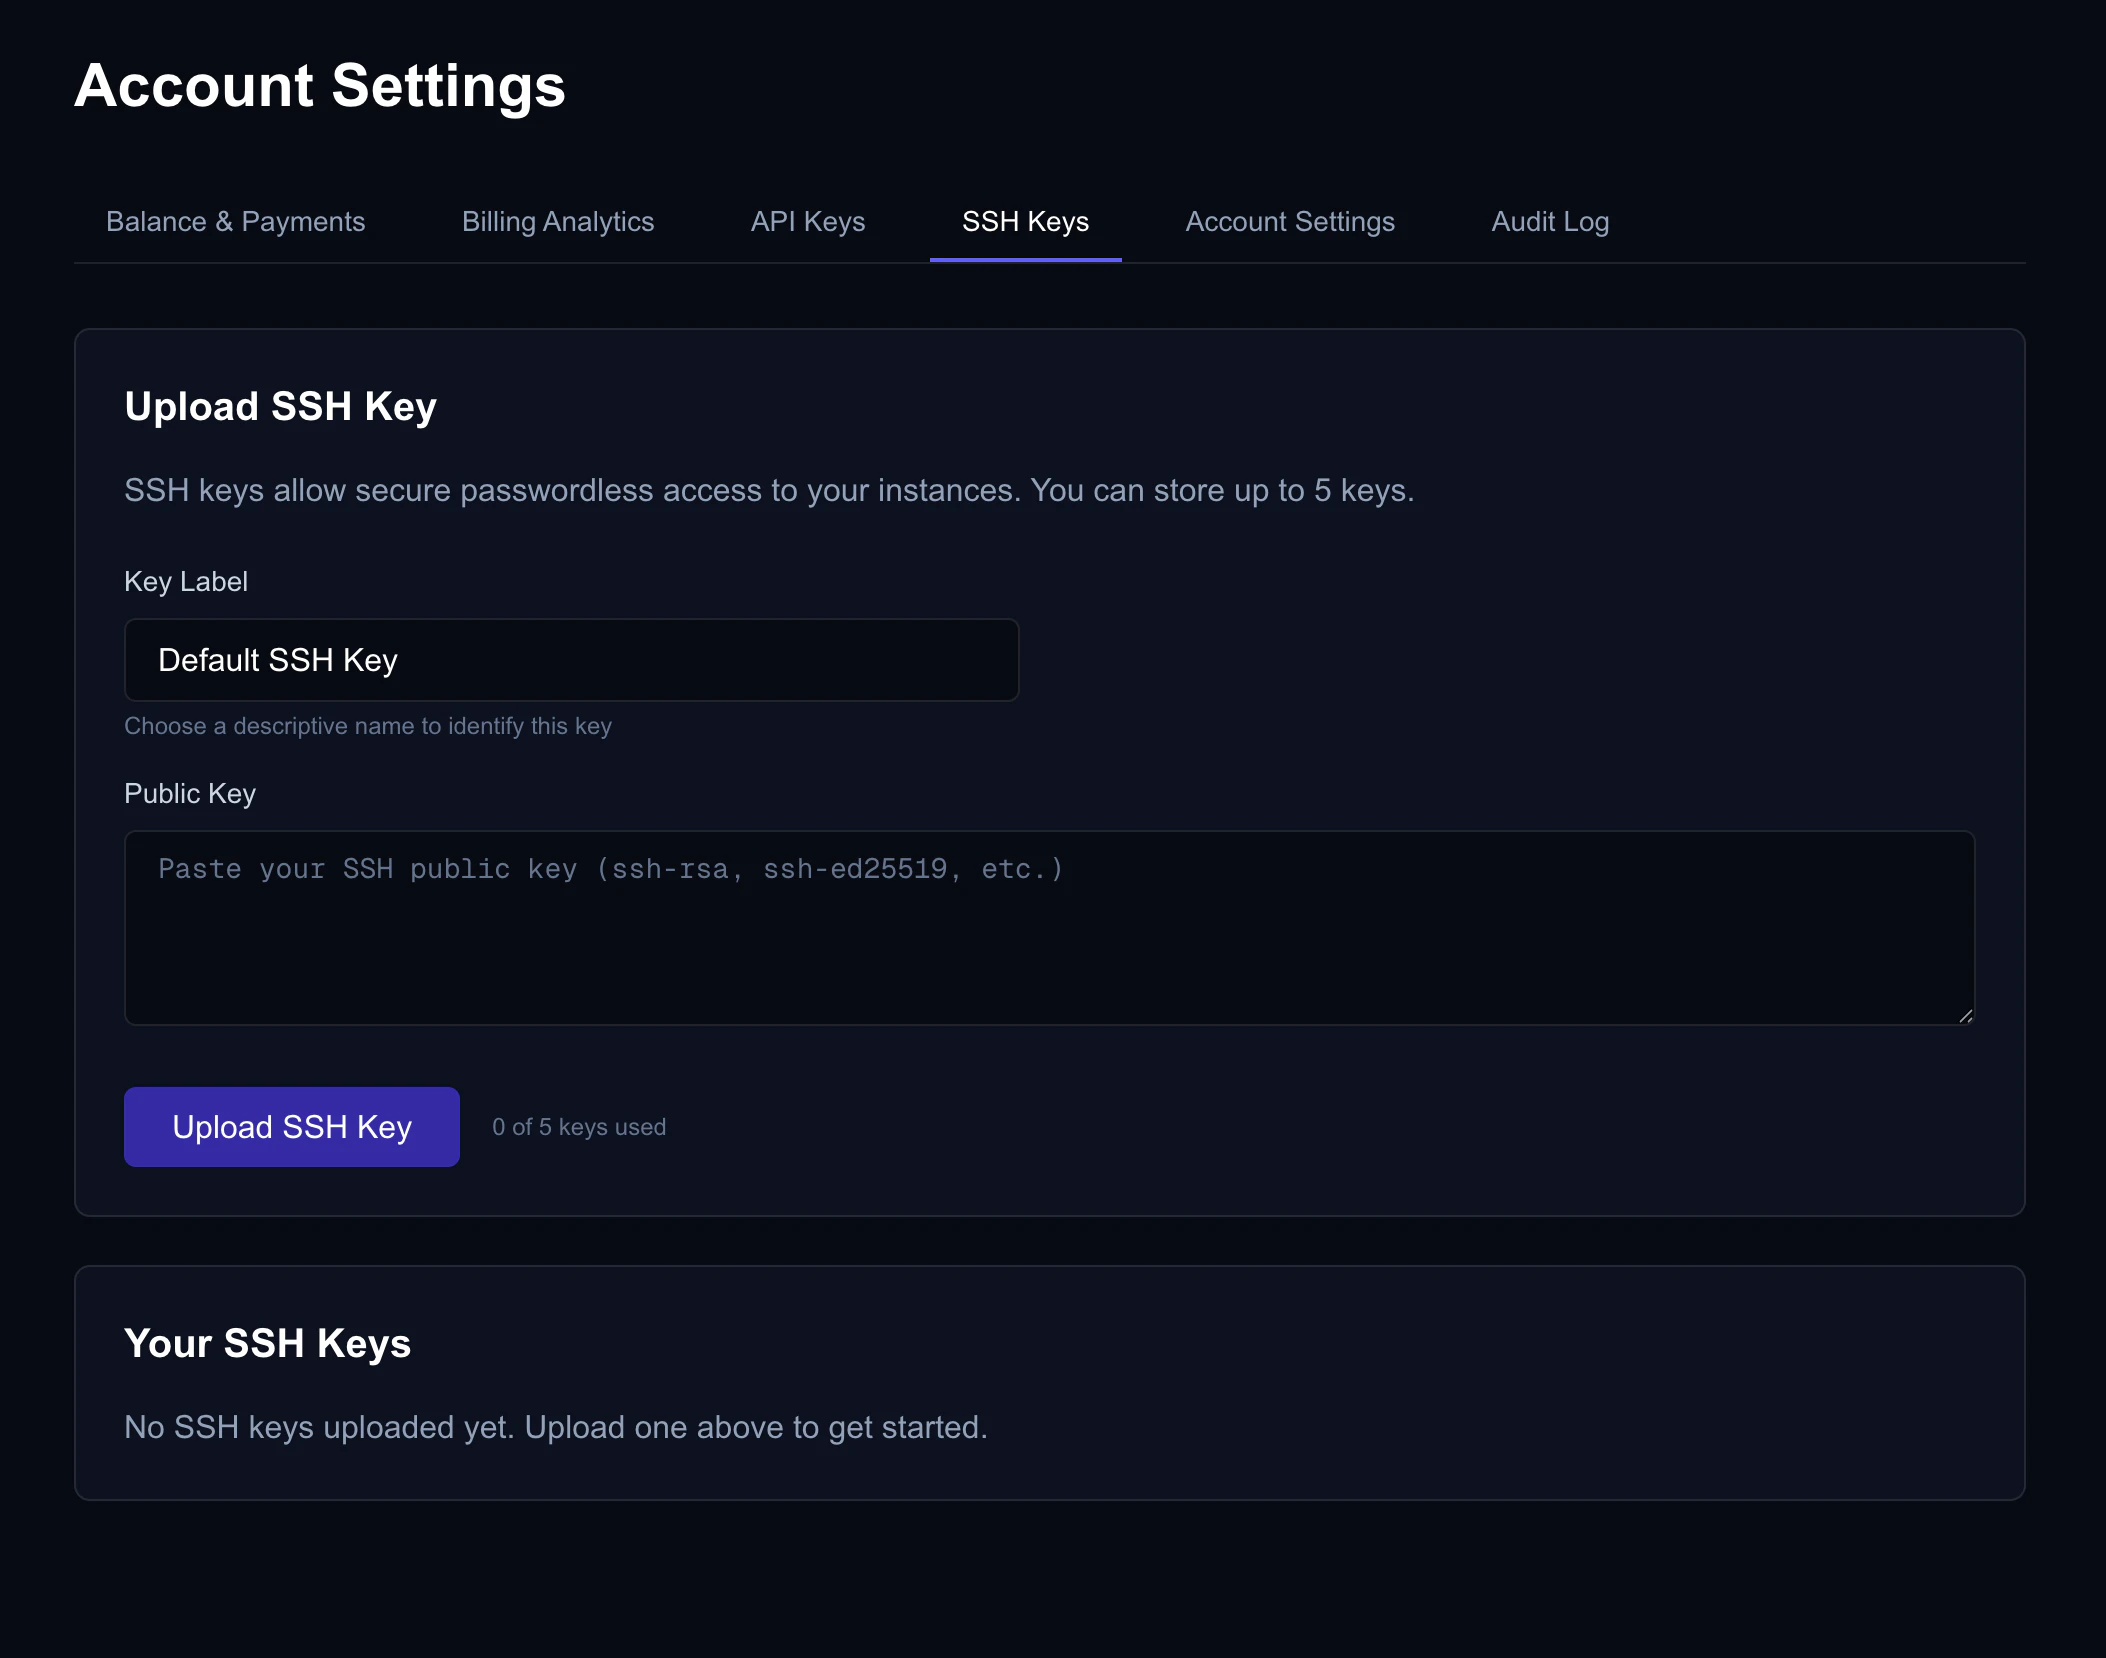 You can upload up to **5 SSH keys** per account. This is useful if you connect from multiple computers.
## Supported Key Types
| Key Type | Algorithm | Recommended? |
| --------------------- | --------------- | :----------------------------: |
| `ssh-ed25519` | Ed25519 | **Yes** — fastest, most secure |
| `ssh-rsa` | RSA (2048+ bit) | Yes — widely compatible |
| `ecdsa-sha2-nistp256` | ECDSA P-256 | Supported |
We recommend **Ed25519** for the best combination of security and performance. The instructions on this page generate Ed25519 keys by default.
## Connecting to a VM
Once your VM is running (you can see the status on the Dashboard), connect using the IP address shown in the console:
```bash theme={null}
ssh ubuntu@
```
**First time connecting?** You'll see a message like:
```
The authenticity of host '...' can't be established.
Are you sure you want to continue connecting (yes/no)?
```
Type `yes` and press Enter. This is normal and only happens once per VM.
```powershell theme={null}
ssh ubuntu@
```
**First time connecting?** You'll see a fingerprint confirmation prompt. Type `yes` and press Enter.
If you generated your key with PuTTYgen:
1. Open **PuTTY**
2. In **Host Name**, enter: `ubuntu@`
3. In the left panel, go to **Connection** → **SSH** → **Auth** → **Credentials**
4. Under "Private key file for authentication", browse to your saved `.ppk` file
5. Click **Open** to connect
### Specifying a Key Manually
If you have multiple SSH keys, you can tell SSH which one to use:
```bash theme={null}
ssh -i ~/.ssh/id_ed25519 ubuntu@
```
## Managing Your Keys
### Viewing Keys
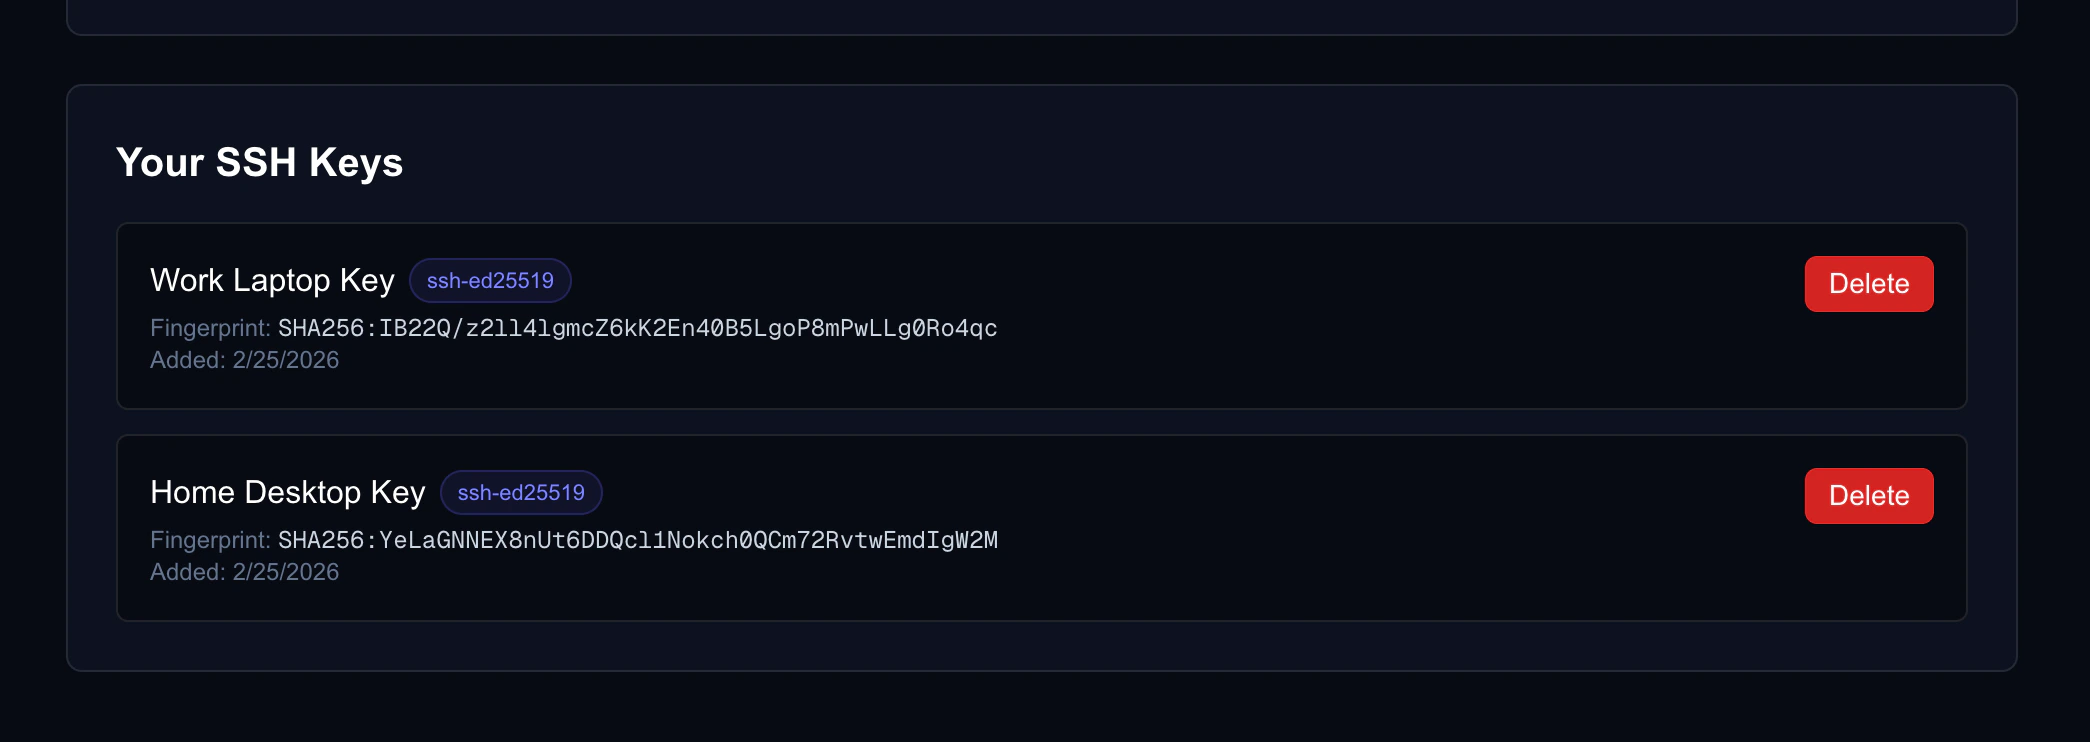
See all your uploaded keys in **Account Settings** → **SSH Keys**. Each key shows its name, type, fingerprint, and when it was added.
You can upload up to **5 SSH keys** per account. This is useful if you connect from multiple computers.
## Supported Key Types
| Key Type | Algorithm | Recommended? |
| --------------------- | --------------- | :----------------------------: |
| `ssh-ed25519` | Ed25519 | **Yes** — fastest, most secure |
| `ssh-rsa` | RSA (2048+ bit) | Yes — widely compatible |
| `ecdsa-sha2-nistp256` | ECDSA P-256 | Supported |
We recommend **Ed25519** for the best combination of security and performance. The instructions on this page generate Ed25519 keys by default.
## Connecting to a VM
Once your VM is running (you can see the status on the Dashboard), connect using the IP address shown in the console:
```bash theme={null}
ssh ubuntu@
```
**First time connecting?** You'll see a message like:
```
The authenticity of host '...' can't be established.
Are you sure you want to continue connecting (yes/no)?
```
Type `yes` and press Enter. This is normal and only happens once per VM.
```powershell theme={null}
ssh ubuntu@
```
**First time connecting?** You'll see a fingerprint confirmation prompt. Type `yes` and press Enter.
If you generated your key with PuTTYgen:
1. Open **PuTTY**
2. In **Host Name**, enter: `ubuntu@`
3. In the left panel, go to **Connection** → **SSH** → **Auth** → **Credentials**
4. Under "Private key file for authentication", browse to your saved `.ppk` file
5. Click **Open** to connect
### Specifying a Key Manually
If you have multiple SSH keys, you can tell SSH which one to use:
```bash theme={null}
ssh -i ~/.ssh/id_ed25519 ubuntu@
```
## Managing Your Keys
### Viewing Keys
See all your uploaded keys in **Account Settings** → **SSH Keys**. Each key shows its name, type, fingerprint, and when it was added.
 ### Deleting a Key
To remove a key you no longer need:
1. Go to **Account Settings** → **SSH Keys**
2. Click the delete button next to the key
3. Confirm the deletion
Deleting a key from your account does **not** remove it from VMs that are already running. It only prevents the key from being added to new VMs.
## Troubleshooting
This means the VM doesn't recognize your key. Try these fixes:
1. **Make sure you uploaded the right key.** The public key you uploaded to Nova Cloud must match the private key on your computer.
2. **Specify the key explicitly:**
```bash theme={null}
ssh -i ~/.ssh/id_ed25519 ubuntu@
```
3. **Check your SSH agent:**
```bash theme={null}
# See which keys are loaded
ssh-add -l
# If your key isn't listed, add it
ssh-add ~/.ssh/id_ed25519
```
4. **Check file permissions (Mac/Linux):** Your private key file must not be readable by others:
```bash theme={null}
chmod 600 ~/.ssh/id_ed25519
```
Windows 10 (version 1809+) and Windows 11 include an SSH client, but it may not be enabled:
1. Open **Settings** → **Apps** → **Optional Features**
2. Click **Add a feature**
3. Search for **OpenSSH Client** and install it
4. Restart PowerShell and try again
Alternatively, use [PuTTY](https://www.chiark.greenend.org.uk/~sgtatham/putty/latest.html) as described above.
Make sure you're uploading the **public** key (ending in `.pub`), not the private key. The public key should be a single line starting with `ssh-ed25519`, `ssh-rsa`, or `ecdsa-sha2-nistp256`.
You can have up to 5 SSH keys per account. Delete unused keys in **Account Settings** → **SSH Keys** before adding new ones.
SSH keys are added to a VM when it's created. If you uploaded a new key after creating a VM, that key won't be on the existing VM.
**Solutions:**
* Create a new VM (it will include your latest keys)
* Or manually add the key inside the running VM:
```bash theme={null}
echo "ssh-ed25519 AAAA..." >> ~/.ssh/authorized_keys
```
If SSH hangs and eventually says "Connection timed out":
1. Make sure the VM is in **Running** status in the dashboard
2. Check that you're using the correct IP address from the dashboard
3. Wait a minute — newly created VMs may take a moment to be fully accessible
4. Try again. If it persists, the VM may be experiencing issues — try stopping and starting it from the dashboard.
### Deleting a Key
To remove a key you no longer need:
1. Go to **Account Settings** → **SSH Keys**
2. Click the delete button next to the key
3. Confirm the deletion
Deleting a key from your account does **not** remove it from VMs that are already running. It only prevents the key from being added to new VMs.
## Troubleshooting
This means the VM doesn't recognize your key. Try these fixes:
1. **Make sure you uploaded the right key.** The public key you uploaded to Nova Cloud must match the private key on your computer.
2. **Specify the key explicitly:**
```bash theme={null}
ssh -i ~/.ssh/id_ed25519 ubuntu@
```
3. **Check your SSH agent:**
```bash theme={null}
# See which keys are loaded
ssh-add -l
# If your key isn't listed, add it
ssh-add ~/.ssh/id_ed25519
```
4. **Check file permissions (Mac/Linux):** Your private key file must not be readable by others:
```bash theme={null}
chmod 600 ~/.ssh/id_ed25519
```
Windows 10 (version 1809+) and Windows 11 include an SSH client, but it may not be enabled:
1. Open **Settings** → **Apps** → **Optional Features**
2. Click **Add a feature**
3. Search for **OpenSSH Client** and install it
4. Restart PowerShell and try again
Alternatively, use [PuTTY](https://www.chiark.greenend.org.uk/~sgtatham/putty/latest.html) as described above.
Make sure you're uploading the **public** key (ending in `.pub`), not the private key. The public key should be a single line starting with `ssh-ed25519`, `ssh-rsa`, or `ecdsa-sha2-nistp256`.
You can have up to 5 SSH keys per account. Delete unused keys in **Account Settings** → **SSH Keys** before adding new ones.
SSH keys are added to a VM when it's created. If you uploaded a new key after creating a VM, that key won't be on the existing VM.
**Solutions:**
* Create a new VM (it will include your latest keys)
* Or manually add the key inside the running VM:
```bash theme={null}
echo "ssh-ed25519 AAAA..." >> ~/.ssh/authorized_keys
```
If SSH hangs and eventually says "Connection timed out":
1. Make sure the VM is in **Running** status in the dashboard
2. Check that you're using the correct IP address from the dashboard
3. Wait a minute — newly created VMs may take a moment to be fully accessible
4. Try again. If it persists, the VM may be experiencing issues — try stopping and starting it from the dashboard.