> ## Documentation Index
> Fetch the complete documentation index at: https://docs.nova-cloud.ai/llms.txt
> Use this file to discover all available pages before exploring further.
# Connecting to an Instance
> Access your GPU instance via SSH or the browser-based WebUI portal.
Once your instance is running, there are two ways to connect: **SSH** for terminal access and **WebUI** for browser-based access. This guide covers both.
## Prerequisites
* A running instance (status shows **Running** in the dashboard)
* For SSH: an SSH key uploaded to your account, or the password you set during instance creation
* For WebUI: an instance created with a supported template (Stable Diffusion, ComfyUI, or Linux Desktop)
## Finding Your Connection Details
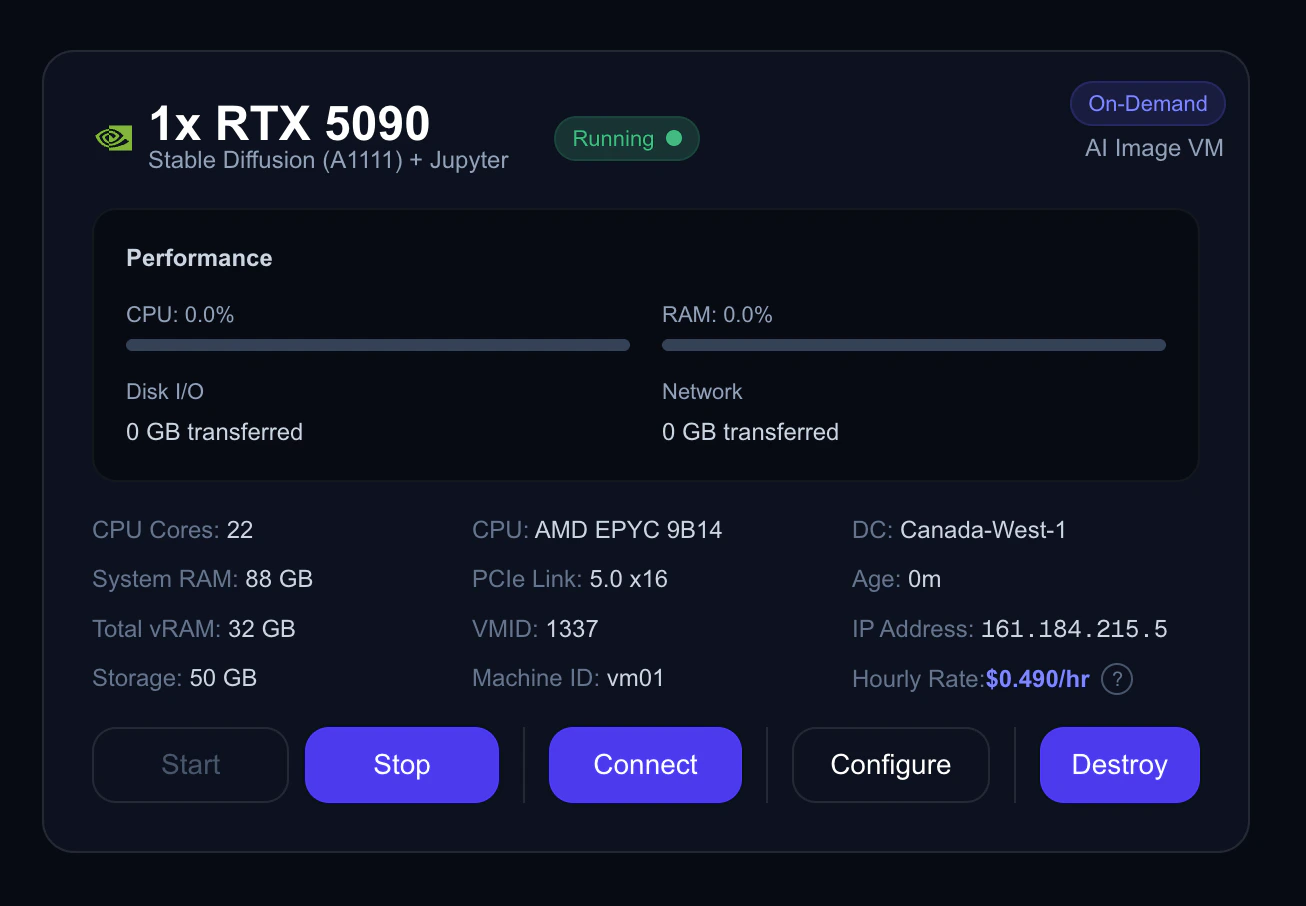
1. Go to **My Instances** in the console
2. Find your running instance
3. Click the **Connect** button
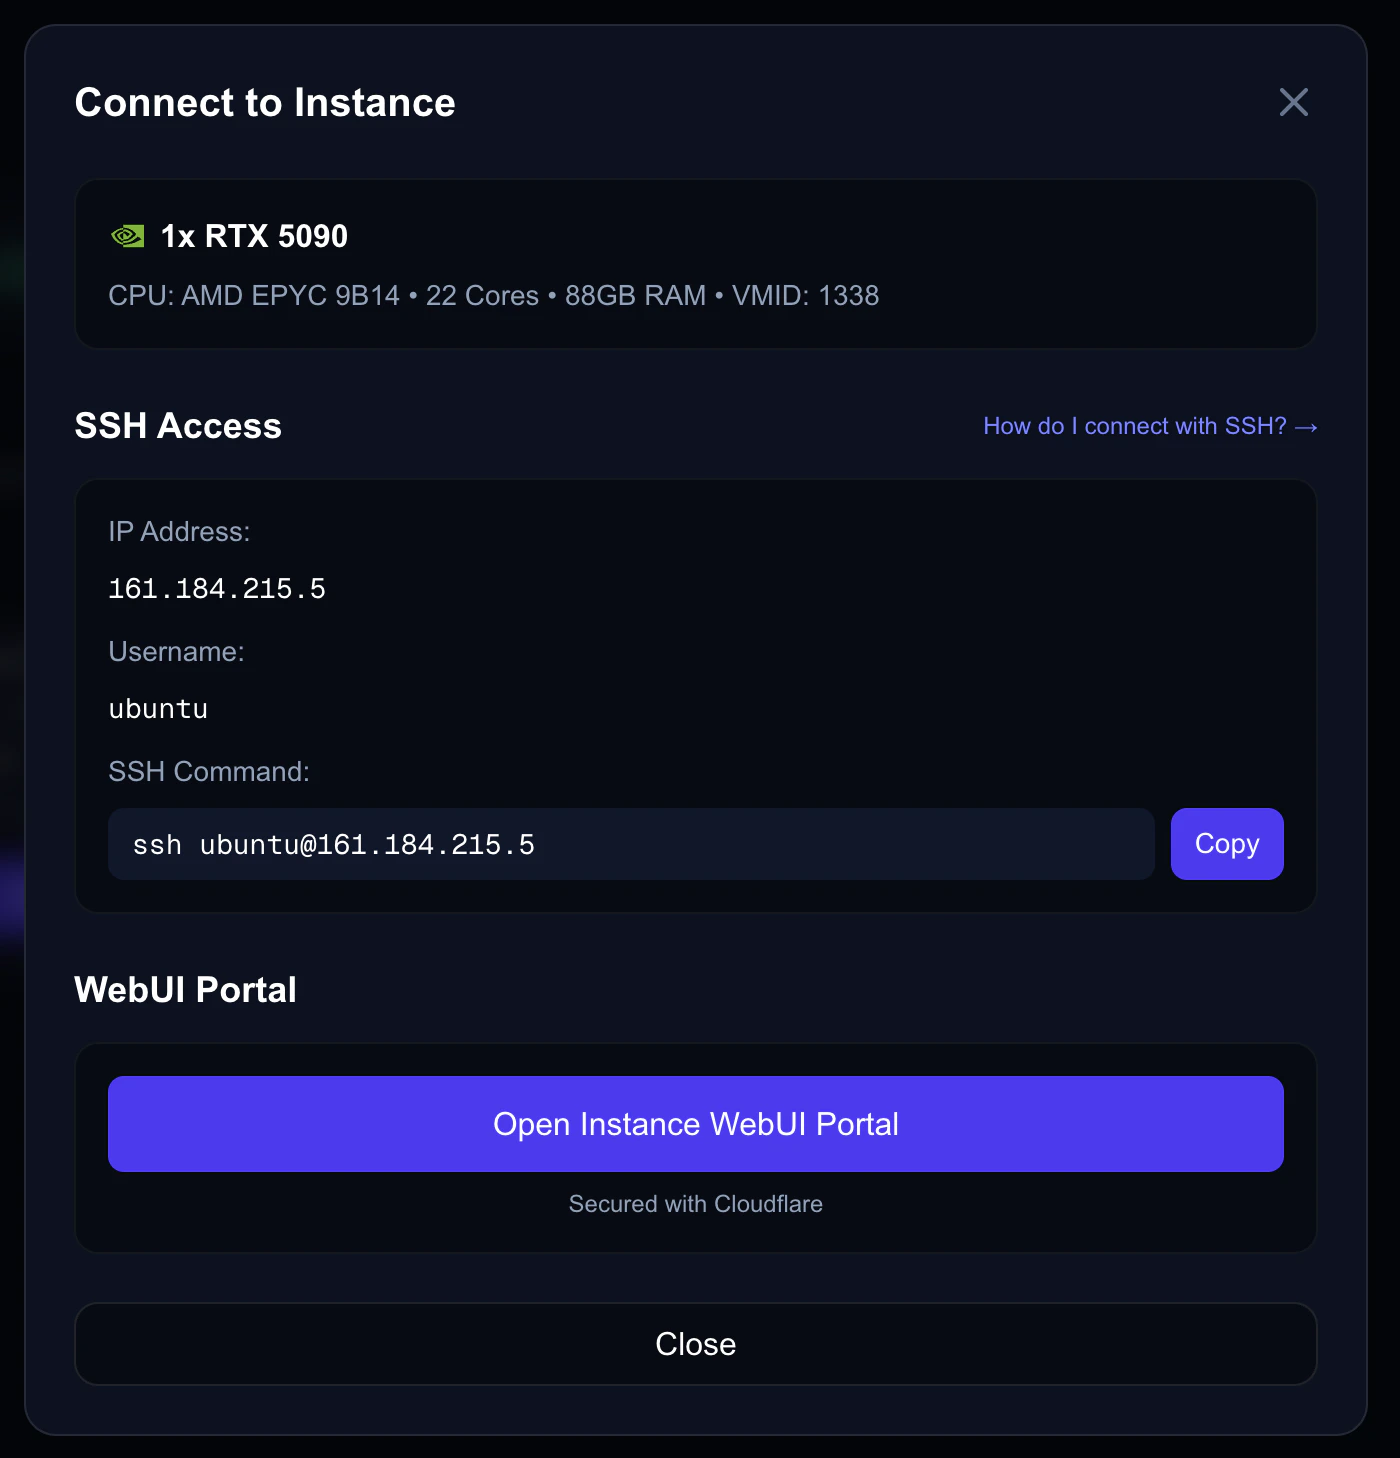
 This opens a window showing your SSH details and WebUI status.
 ## Connecting via SSH
SSH gives you full terminal access to your instance. This is the primary way to interact with your VM.
### Your SSH Details
| Detail | Value |
| -------------- | ------------------------------------------------- |
| **IP Address** | Shown after clicking **Connect** on your instance |
| **Username** | `ubuntu` |
| **Port** | `22` (default) |
### Connect from Your Terminal
Open **Terminal** (Cmd + Space → "Terminal") and run:
```bash theme={null}
ssh ubuntu@
```
Replace `` with the IP address shown after clicking **Connect**.
Click the **copy button** in the connection details to copy the full SSH command to your clipboard, ready to paste.
Open **PowerShell** (Start → "PowerShell") and run:
```powershell theme={null}
ssh ubuntu@
```
Replace `` with the IP address shown after clicking **Connect**.
Windows 10/11 includes an SSH client by default. If `ssh` is not found, enable it via **Settings → Apps → Optional Features → OpenSSH Client**.
If you use PuTTY instead of the built-in SSH client:
1. Open **PuTTY**
2. In **Host Name**, enter: `ubuntu@`
3. Ensure **Port** is `22` and **Connection type** is **SSH**
4. Go to **Connection → SSH → Auth → Credentials**
5. Under "Private key file", browse to your `.ppk` key file
6. Click **Open** to connect
Open a terminal and run:
```bash theme={null}
ssh ubuntu@
```
Replace `` with the IP address shown after clicking **Connect**.
### First-Time Connection
When connecting to an instance for the first time, you'll see a host key verification prompt:
```
The authenticity of host '203.0.113.50 (203.0.113.50)' can't be established.
ED25519 key fingerprint is SHA256:xxxxxxxxxxxxxxxxxxxxxxxxxxxxxxxxxxxxxxxxxxx.
Are you sure you want to continue connecting (yes/no/[fingerprint])?
```
Type `yes` and press Enter. This is normal and only happens once per instance. Your computer remembers the host key for future connections.
### Using a Specific SSH Key
If you have multiple SSH keys, specify which one to use:
```bash theme={null}
ssh -i ~/.ssh/id_ed25519 ubuntu@
```
### Connecting with a Password
If you chose password authentication when creating the instance:
```bash theme={null}
ssh ubuntu@
```
You'll be prompted to enter the password you set during creation.
## Connecting via WebUI Portal
The WebUI portal gives you browser-based access to web applications running on your instance. This is available for instances created with specific templates.
### Supported Templates
| ID | Template | WebUI Access |
| ----- | -------------------------------------- | ----------------------------- |
| `100` | Ubuntu 22.04 Base | Not available |
| `101` | Ubuntu 24.04 Base | Not available |
| `102` | **Stable Diffusion (A1111) + Jupyter** | Automatic1111 WebUI + Jupyter |
| `103` | **ComfyUI + Jupyter** | ComfyUI + Jupyter |
| `104` | **Linux Desktop + Jupyter** | Desktop environment + Jupyter |
### Accessing the WebUI
1. Go to **My Instances** and click **Connect** on your running instance
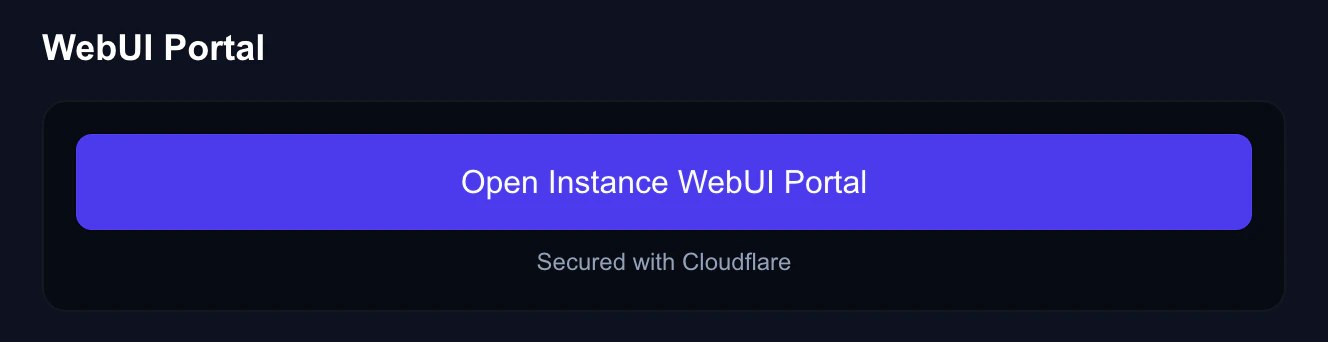
2. In the connection details window, find the **WebUI Portal** section
3. Click **Open WebUI** to launch the portal in a new browser tab
## Connecting via SSH
SSH gives you full terminal access to your instance. This is the primary way to interact with your VM.
### Your SSH Details
| Detail | Value |
| -------------- | ------------------------------------------------- |
| **IP Address** | Shown after clicking **Connect** on your instance |
| **Username** | `ubuntu` |
| **Port** | `22` (default) |
### Connect from Your Terminal
Open **Terminal** (Cmd + Space → "Terminal") and run:
```bash theme={null}
ssh ubuntu@
```
Replace `` with the IP address shown after clicking **Connect**.
Click the **copy button** in the connection details to copy the full SSH command to your clipboard, ready to paste.
Open **PowerShell** (Start → "PowerShell") and run:
```powershell theme={null}
ssh ubuntu@
```
Replace `` with the IP address shown after clicking **Connect**.
Windows 10/11 includes an SSH client by default. If `ssh` is not found, enable it via **Settings → Apps → Optional Features → OpenSSH Client**.
If you use PuTTY instead of the built-in SSH client:
1. Open **PuTTY**
2. In **Host Name**, enter: `ubuntu@`
3. Ensure **Port** is `22` and **Connection type** is **SSH**
4. Go to **Connection → SSH → Auth → Credentials**
5. Under "Private key file", browse to your `.ppk` key file
6. Click **Open** to connect
Open a terminal and run:
```bash theme={null}
ssh ubuntu@
```
Replace `` with the IP address shown after clicking **Connect**.
### First-Time Connection
When connecting to an instance for the first time, you'll see a host key verification prompt:
```
The authenticity of host '203.0.113.50 (203.0.113.50)' can't be established.
ED25519 key fingerprint is SHA256:xxxxxxxxxxxxxxxxxxxxxxxxxxxxxxxxxxxxxxxxxxx.
Are you sure you want to continue connecting (yes/no/[fingerprint])?
```
Type `yes` and press Enter. This is normal and only happens once per instance. Your computer remembers the host key for future connections.
### Using a Specific SSH Key
If you have multiple SSH keys, specify which one to use:
```bash theme={null}
ssh -i ~/.ssh/id_ed25519 ubuntu@
```
### Connecting with a Password
If you chose password authentication when creating the instance:
```bash theme={null}
ssh ubuntu@
```
You'll be prompted to enter the password you set during creation.
## Connecting via WebUI Portal
The WebUI portal gives you browser-based access to web applications running on your instance. This is available for instances created with specific templates.
### Supported Templates
| ID | Template | WebUI Access |
| ----- | -------------------------------------- | ----------------------------- |
| `100` | Ubuntu 22.04 Base | Not available |
| `101` | Ubuntu 24.04 Base | Not available |
| `102` | **Stable Diffusion (A1111) + Jupyter** | Automatic1111 WebUI + Jupyter |
| `103` | **ComfyUI + Jupyter** | ComfyUI + Jupyter |
| `104` | **Linux Desktop + Jupyter** | Desktop environment + Jupyter |
### Accessing the WebUI
1. Go to **My Instances** and click **Connect** on your running instance
2. In the connection details window, find the **WebUI Portal** section
3. Click **Open WebUI** to launch the portal in a new browser tab
 ### WebUI Status
The portal can be in one of three states:
| Status | Meaning |
| ---------------- | ----------------------------------------------------------------------------------- |
| **Ready** | The WebUI is ready to use — click to open |
| **Initializing** | The portal is starting up (typically 30–60 seconds after boot) — wait and try again |
| **Unavailable** | This template doesn't include a WebUI, or the instance isn't running |
The WebUI portal is secured via Cloudflare. It provides authenticated access to web services running inside your VM without needing to open ports manually.
## Keeping Your Session Alive
Long SSH sessions can disconnect due to network timeouts. To prevent this, configure your SSH client to send keepalive packets.
### Mac / Linux
Add these lines to your `~/.ssh/config` file:
```
Host *
ServerAliveInterval 60
ServerAliveCountMax 3
```
This sends a keepalive packet every 60 seconds and disconnects after 3 missed responses.
### Windows (PowerShell SSH)
Create or edit `C:\Users\YourName\.ssh\config` with the same configuration:
```
Host *
ServerAliveInterval 60
ServerAliveCountMax 3
```
## Transferring Files
### Upload Files to Your Instance
Use `scp` to copy files:
```bash theme={null}
# Upload a single file
scp myfile.txt ubuntu@:~/
# Upload an entire directory
scp -r my-folder/ ubuntu@:~/
```
PowerShell includes `scp`:
```powershell theme={null}
# Upload a single file
scp myfile.txt ubuntu@:~/
# Upload an entire directory
scp -r my-folder/ ubuntu@:~/
```
### Download Files from Your Instance
```bash theme={null}
# Download a single file
scp ubuntu@:~/results.csv ./
# Download an entire directory
scp -r ubuntu@:~/output/ ./
```
For large file transfers, consider using `rsync` for resumable transfers:
```bash theme={null}
rsync -avz --progress ubuntu@:~/large-dataset/ ./local-copy/
```
## Troubleshooting
* Verify the instance status is **Running** in the dashboard
* Double-check the IP address — click **Connect** on your instance to find it
* Wait 1–2 minutes if the instance was just started; SSH may take a moment to be ready
Your SSH key doesn't match. Try:
1. Check which keys are loaded: `ssh-add -l`
2. Specify the key explicitly: `ssh -i ~/.ssh/id_ed25519 ubuntu@`
3. Verify you uploaded the correct public key to Nova Cloud (Account → SSH Keys)
See the [SSH Keys troubleshooting guide](/guides/ssh-keys#troubleshooting) for more details.
* Confirm the instance is in **Running** state
* Newly created instances can take up to 10 minutes to provision — check the status in the dashboard
* Try stopping and starting the instance from the dashboard
The WebUI portal typically starts within 30–60 seconds. If it's been longer:
* Try closing and reopening the connection details
* Stop and start the instance
* Check if the instance is still **Running** in the dashboard
This happens if you've connected to a different instance that previously had the same IP address. Remove the old key:
```bash theme={null}
ssh-keygen -R
```
Then try connecting again.
## What's Next?
Open ports for web services, Jupyter, and custom APIs.
Manage your SSH keys and troubleshoot connection issues.
### WebUI Status
The portal can be in one of three states:
| Status | Meaning |
| ---------------- | ----------------------------------------------------------------------------------- |
| **Ready** | The WebUI is ready to use — click to open |
| **Initializing** | The portal is starting up (typically 30–60 seconds after boot) — wait and try again |
| **Unavailable** | This template doesn't include a WebUI, or the instance isn't running |
The WebUI portal is secured via Cloudflare. It provides authenticated access to web services running inside your VM without needing to open ports manually.
## Keeping Your Session Alive
Long SSH sessions can disconnect due to network timeouts. To prevent this, configure your SSH client to send keepalive packets.
### Mac / Linux
Add these lines to your `~/.ssh/config` file:
```
Host *
ServerAliveInterval 60
ServerAliveCountMax 3
```
This sends a keepalive packet every 60 seconds and disconnects after 3 missed responses.
### Windows (PowerShell SSH)
Create or edit `C:\Users\YourName\.ssh\config` with the same configuration:
```
Host *
ServerAliveInterval 60
ServerAliveCountMax 3
```
## Transferring Files
### Upload Files to Your Instance
Use `scp` to copy files:
```bash theme={null}
# Upload a single file
scp myfile.txt ubuntu@:~/
# Upload an entire directory
scp -r my-folder/ ubuntu@:~/
```
PowerShell includes `scp`:
```powershell theme={null}
# Upload a single file
scp myfile.txt ubuntu@:~/
# Upload an entire directory
scp -r my-folder/ ubuntu@:~/
```
### Download Files from Your Instance
```bash theme={null}
# Download a single file
scp ubuntu@:~/results.csv ./
# Download an entire directory
scp -r ubuntu@:~/output/ ./
```
For large file transfers, consider using `rsync` for resumable transfers:
```bash theme={null}
rsync -avz --progress ubuntu@:~/large-dataset/ ./local-copy/
```
## Troubleshooting
* Verify the instance status is **Running** in the dashboard
* Double-check the IP address — click **Connect** on your instance to find it
* Wait 1–2 minutes if the instance was just started; SSH may take a moment to be ready
Your SSH key doesn't match. Try:
1. Check which keys are loaded: `ssh-add -l`
2. Specify the key explicitly: `ssh -i ~/.ssh/id_ed25519 ubuntu@`
3. Verify you uploaded the correct public key to Nova Cloud (Account → SSH Keys)
See the [SSH Keys troubleshooting guide](/guides/ssh-keys#troubleshooting) for more details.
* Confirm the instance is in **Running** state
* Newly created instances can take up to 10 minutes to provision — check the status in the dashboard
* Try stopping and starting the instance from the dashboard
The WebUI portal typically starts within 30–60 seconds. If it's been longer:
* Try closing and reopening the connection details
* Stop and start the instance
* Check if the instance is still **Running** in the dashboard
This happens if you've connected to a different instance that previously had the same IP address. Remove the old key:
```bash theme={null}
ssh-keygen -R
```
Then try connecting again.
## What's Next?
Open ports for web services, Jupyter, and custom APIs.
Manage your SSH keys and troubleshoot connection issues.